Color calibration is one of those things that you buy relatively expensive gadgets to asses and correct deviations in visual displays. If you care about your digital imaging process, calibration is critical – buying the gadgets that help simply provide a piece of mind that what you see is as close to what it should be as possible. Add an extra display, as I did, and suddenly you are thrown into the depths of color correction. You never knew how different displays could be.
I use an Eye-One Display 2 by GreytagMacbeth on my two Lenovo ThinkVision L201p displays driven by an NVIDIA Quadro4 980 XGL. Xrite, the owners of GreytagMacbeth recommend using two different video cards as not many dual-display cards allow different profiles to be applied independently. They rely upon the underlying operating system to automate the monitor selection and profile setting. Naturally, Microsoft has a utility that will allow you to apply a different color profile for each display attached to a given system. That is where their guidance stops.
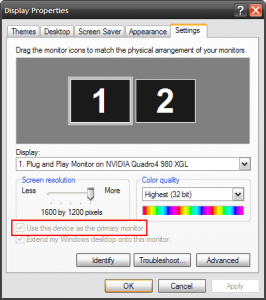
If you have tried this yourself, one of the things you will notice is that simply setting the “primary display†setting on your display properties control panel doesn’t do the trick.
This will tell the i1Match software where the i1Display 2 device is, but from what I can tell, it continues to work with the other display’s color profile. At first, I thought it was enough to save the different profiles out with different names and then activate them with Microsoft’s Color Control Applet. Short answer, is that the two displays looked wildly different. Here is what I did to get it all working.
Calibrating two displays driven by the same video card with the i1Display 2
First, download the Microsoft Color Control Panel Applet for Windows XP (that’s what I run so maybe there is something else for other versions of Windows).
Second, calibrate you first monitor. I use the i1Match Software that came with my i1Display 2.
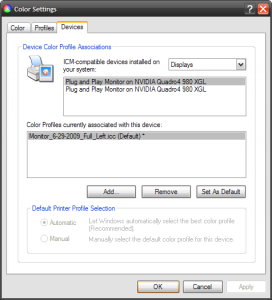
Third, save the profile with a name that will indicate which display it is for. For example, “Monitor_6-29-2009_Full_Left.iccâ€. This tells me not only the date, but how much of the calibration process I followed and for which monitor, in this case, the left one.
Fourth, swap your monitor cables. I know, so simple! Repeat steps 2 and 3.
Fifth, swap your monitor cables back.
Sixth, open up the Microsoft Color Control Panel Applet and assign the new color profiles to your displays. iMatch Software will have certainly screwed this part up, so remove all the profiles that are no longer relevant. Assigning a profile to a display is easy after you have “added†it to the possible selections.
At this point, your displays are calibrated. A simple verification test is opening a photograph and dragging it across the displays to notice any variations. This is what let me know there was a problem the first time, one was noticeably warmer than the other. After following the above, each represents the image the same way – let us hope faithfully!


